
Very recently, I was working with one of my lovely clients helping her by phone choose a sofa, chairs and pillows for her new living room. The subject of curtain panels came up and I realized this is a perfect subject for my blog! Having hung many curtains over the years for myself, clients and friends, I was reminded of what it was about the window treatments that always seemed to give the rooms the WOW factor! I thought I would share a couple of tips with you that I have learned over the years that might bring your room to the next level decoratively speaking and perhaps help you on your journey when it comes to shopping for panels and rods:
1 - Hang them higher than you may think. The reason is that hanging them higher gives you a feeling that your windows are actually higher than they really are! Yep, it tricks your eye. So, if you have a window with lets say 15” above it until your ceiling or your crown molding, you have plenty of room to hang them higher. For me, it depends on the space, but anywhere from 4 - 10” higher has seemed to work for me. What I do is consider my ceiling height first. If I have 9’ ceilings where the panels will go I realize I have 108” in total length to the ceiling itself. This will seem unnatural to think about, but 95” panels (which are more readily available without spending the money for custom panels) will work great! 108'“- 95” (panel) = 13” which means there is definitely enough room to go with 95” panels and still have some “breathing room” (some people recommend no more than halfway between the molding and the ceiling.) Let your space determine how high you need to go, because every room is different. It is helpful to have someone stand on a ladder with one of the panels on and hold it up so you can stand back and see how high you need to go. Remember if you are using the ring/clip method, to put those on the panel as you measure. If it’s a grommeted panel just put it right on the rod.
2 - Hang them wider than you may have considered. When you are shopping for curtain rods, remember to measure for each panel width (divided by 2) and allow that much extra on either side of the window. For example: Designer drapery width is 54” and when they are hanging on the outside of the frame of the window, you need to divide that number in half for what is called “stack back.” Stack back is how wide they will measure when they are bunched up on the rod on the outside of your window and a good rule of thumb is about 1/2 of whatever size width you get. So for a 54” panel, you need to allow for about 27” on each side extra when measuring for your rods. Thats a full 54” wider for your rod than what you might normally be inclined to buy! If you are like me, when you mount it like this the first time, it will make you think, “what am I doing?” or “this just doesn't seem right.” The goal is to allow only the edge of each panel to just cover the molding itself and not hang into the window. Doing this creates the illusion that you have bigger windows than you actually do (because you can’t see the side moldings! It’s an easy and wonderful way to expand the feel of your room! Keep in mind that some windows will not allow you the space to put the curtains that far out on each side. When you stack them back, you will likely be able to get away with less than half of the width measurement because you can often push them tighter together to make it work.
FINDING 54” PANELS:
Many big decorating stores (like the ones that having lots of Bed and Bath stuff) :) may not carry many choices in 54” wide panels. Most stores you can walk in and buy panels from consider 48” just fine for width. So, for instance, you will find a plethora of 48” x 84” panels. You can make a 48” X 84” panel work, but I usually only do with 8’ ceilings and I choose the non-grommeted ones when possible and add the rings with the alligator clips to allow me to hang them higher than normal. They can work for most applications and for smaller windows, etc. I do have a strong preference for the added fullness even a 54” wide panel gives when it is stacked back. It definitely has a more designer look.
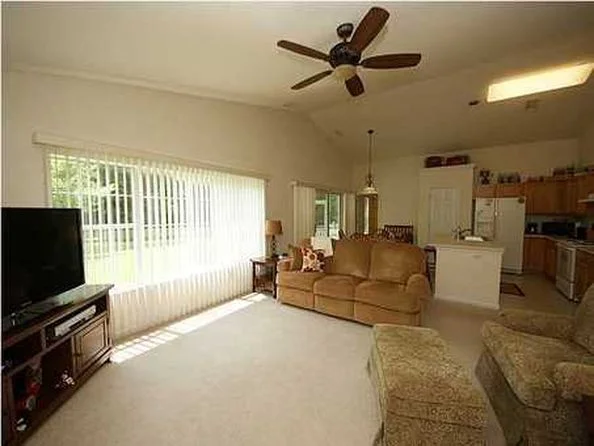
Great room BEFORE the remodel. Dated and drab with multiple design issues.
EXCEPTIONS TO WIDE PANEL
There are always exceptions to every rule. For instance, here is a recent remodel I did several years ago (see BEFORE picture to left). The vertical blinds were dated and did absolutely nothing to bring in the pond view or highlight the space. There are many design issues that needed to be and were addressed with this home, but this is a blog post on window treatments!
I knew the blinds had to go, so I replaced them with the reasonable white 2” blinds from the big box store. There was never even going to be a neighbor behind this home because of the protected wetlands, so the windows could stay open most of the time.
There is nothing more spectacular than a wall of windows, but in this room the beauty of having multiple windows also brought with it a design challenge. There just was not enough room for the stack back on each panel if I used traditional width panels. I did not want to take away any of the light or pond view in this home, but wanted something earthy and natural to help bring the feel of the outside in and to further highlight the view.
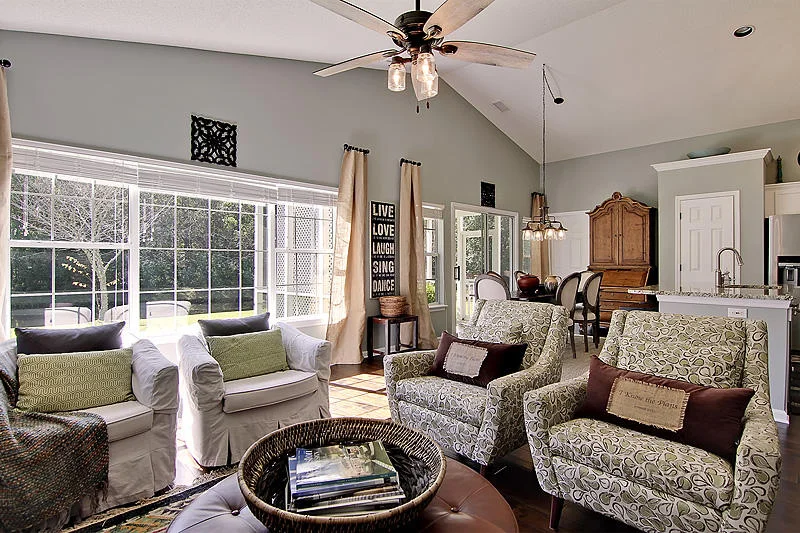
Great Room AFTER the remodel. Updated with the pond view enhanced and the feeling of bringing the outside in with the new paint color.
After measuring I realized I needed each of my panels to only be 1/2 of 48” (24”) which was going to give me a stack back of 12” (24” / 2 = 12”). I only had room for a 12” wide panel on each side of each window. To get creative and save money, I asked an Etsy seller if she could vertically cut some existing burlap (organic feeling) panels that she had already made in half and just sew up the newly cut sides. She agreed and the savings was definitely worthwhile compared with totally custom panels.
I needed poles and small ones are hard to find and expensive. I went to the big box hardware store and looked at poles and found the larger diameter ones, which I knew would look better with the higher ceilings. I had to find finials that would fit the poles I found BEFORE having the poles cut. Once I found those, I had them cut and purchased two ended screws made to attach finials to poles, stained all of the pieces a dark stain, screwed them on and “viola!” Narrow curtain panels for strictly decorative purposes. Note how high I hung them and how much more important the room looked? I don’t often puddle panels anymore, but in this room I decided to to give a more relaxed feel to the space.
SUMMING IT UP:
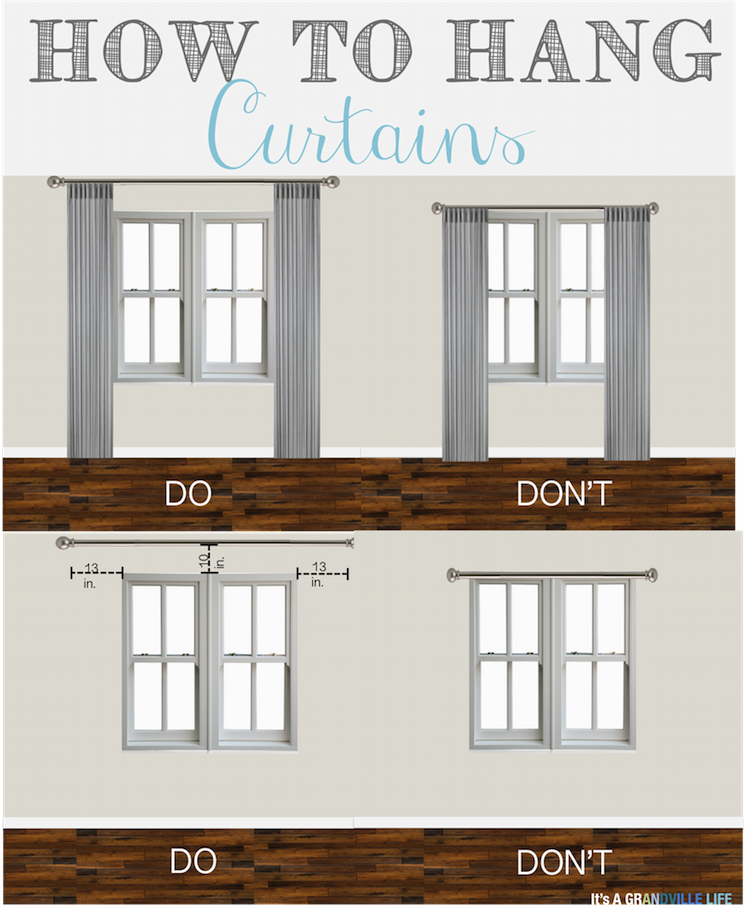
I’ve been hanging curtains like this for many years but I found this photo a few days ago that Megan from www.itsagrandvillelife.com had posted on Pinterest when I searched for hanging curtains so I wanted to share it with you in hopes it might help you visualize what I have been sharing. Note, one of the pictures shows only 13” extra on each side. From my experience that is not enough to keep even a 48” wide panel totally out of the glass on the window. If it’s all the room you have to work with, it’s certainly better than only a few inches.
I hope these tips were helpful for you and that you are able to think outside of the box now when it comes to hanging curtain panels. I promise you won’t regret taking the plunge. As an added tip, if you don’t like the “gap” created by hanging them higher, you can do what I did, add some sort of a decorative medallion to fill that space in visually. You can also do more than just one, but you could do as many as 3 depending on the size of the window. Start with a medallion or small decorative element in the center and then add two more on either side and you will have a unique look.
For now, it’s time for me to go and get creative. If you need creative interior design help in the Hendersonville, NC area, just give me a call at 843-327-8922.
